Visual Notes: Crash Course

Posted by yanti on Wednesday, October 29, 2014


How much more likely are you to read an infograph than an actual article or research study? Probably a lot more likely, right? In fact, 90% of info transmitted to our brains is visual! "Yeah, so what?" you might be asking. So... have you ever considered using visual notes for studying instead of just writing out a bunch of words? You know, a little like creating your own infograph? I started doing this for two reasons:


  • #1: When I was in high school, we had a teacher who would allow us to create a 1-page study guide that we could use on our tests. I know, I know... sounds so easy, right? And you are right, it was easy. But here is what our teacher knew: He knew that we would spend SO MUCH time analyzing and evaluating what information to put on those study guides, that we would secretly be learning more information the whole time we were creating them! Pretty sneaky, huh? 


  • #2: I am a visual learner. And you probably are, too. In fact, 65 percent of us are visual learners! This is why we may get overwhelmed when we open a document/e-mail/textbook that just has dense paragraphs and paragraphs full of words. And I don't mean for that to sound as bad as it may sound (like we're too lazy to read a book or something). It's just that images, like charts or graphs or illustrations or photographs, can make it easier on our eyes and our brains because they improve a document's readability

In fact, when I was in my Educational Psychology class a few years ago (favorite one ever, btw), our professor told us that one of the jobs within that field is to create those little images and tables in textbooks! I just thought it was pretty cool... I never even thought about why they were in there! Now I notice them all the time (AND I actually pay attention to them)!  


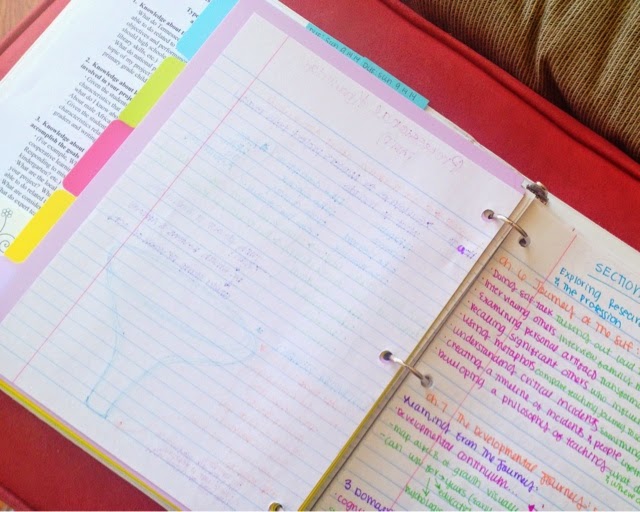
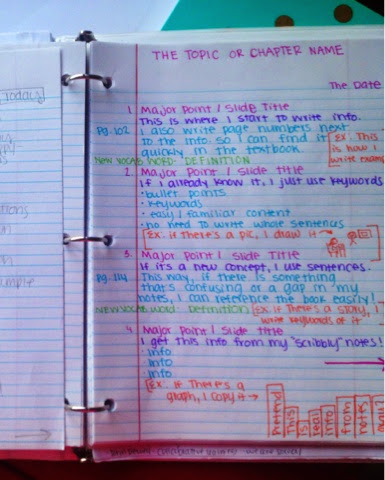
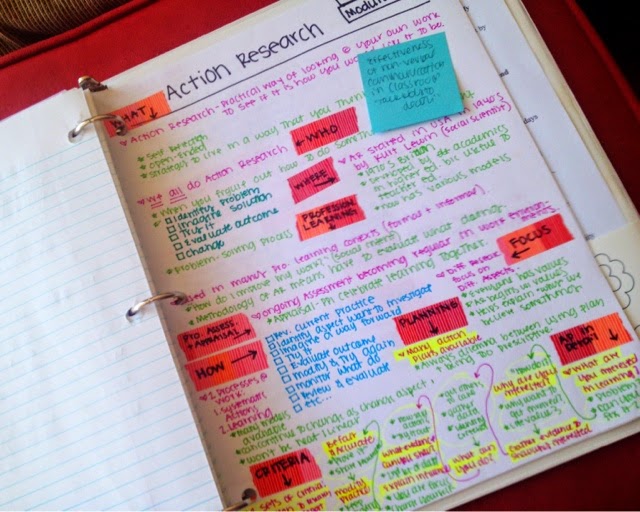
Now, whenever I'm feeling particularly overwhelmed by a topic, I try to put all of the most important info onto ONE PAGE using a mixture of bullet points, charts, drawings, keywords, whatever I think will help! I created a study sheet of visual notes for my most recent certification exam (the last one ever. YAY!). Luckily, I took photos of this one because, as you know, studying is a little like working out: If you don't photograph it, it doesn't count.

As you can clearly see, stick people are my specialty. Just look at Jean Piaget's glasses.
Remarkable talent. 

So, how about this: How about if, the next time you're studying for an exam, you comb through your notes and your textbook and create an infograph-style study sheet. One sheet (or poster) with pictures to quickly trigger certain concepts in your brian with a few keywords or major facts to remember! Then hang it up somewhere where you will see it frequently throughout the day (like above your desk or on your mirror to look at while you're getting ready). 

Maybe you'll be able to get a little more into studying using a method like this than you would if you had to sit down, pull out your notes, and flip back through pages and pages of your own handwriting! I have included some examples of "visual notes" to inspire y'all! Also, there are links to several different sites that mention them (and other things) as well! 

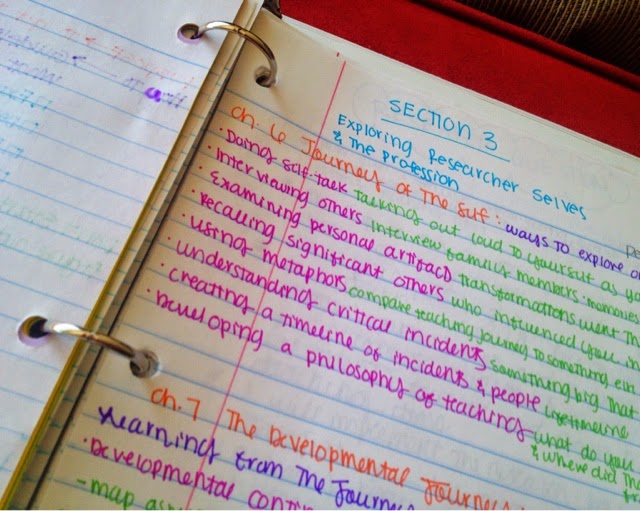
Of course I love this one by Liz Cazaly because it's about education, too! Win-Win!

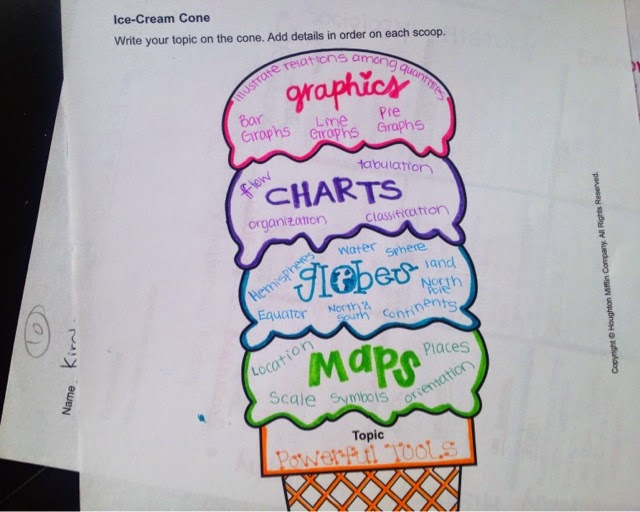
This one is by Austin Kleon (of austinkleon.com) achieves what I was TRYING to do in the photo above.  

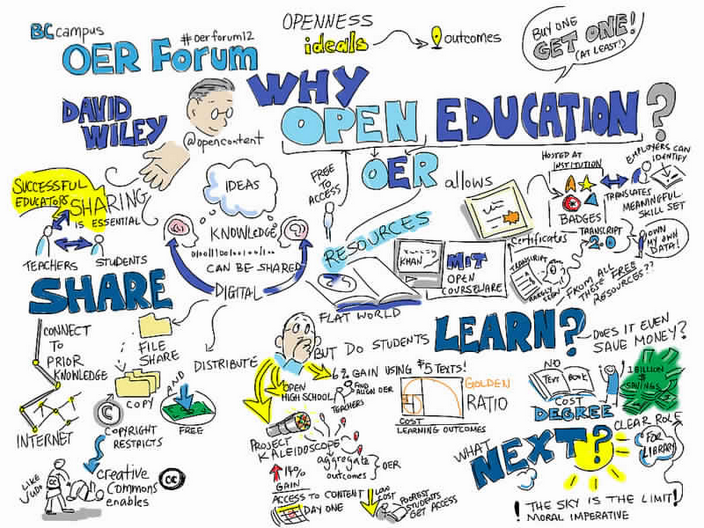
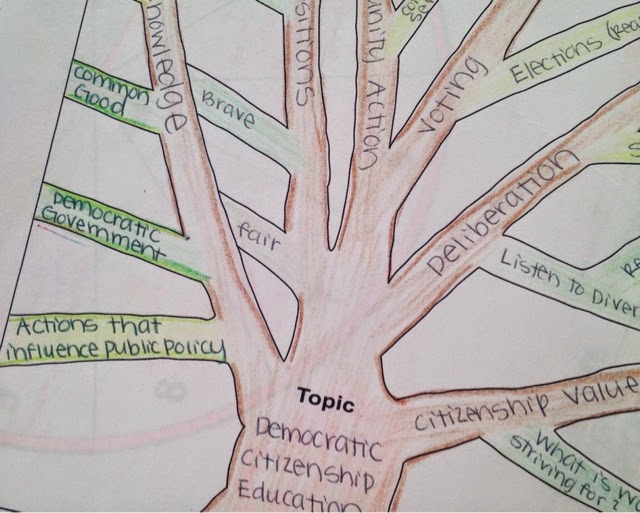
And this one by Guilia Forsythe makes it easy to scan through the categories of the topic! 


Here are some links to sites that are
not drawn by Kindergarten teachers
actually informative on this topic 
talented at drawing visual notes 
...helpful


Remember, it doesn't have to be good to be effective!
Thank goodness! :)


Do you take visual notes or have you ever tried? How do you typically create study guides? Have you tried that trick of putting them on your mirror (or somewhere in your home)... if so, did it help or not help? 
More aboutVisual Notes: Crash Course

Eating Our Way Through Paris

Posted by yanti on Sunday, October 26, 2014


Paris!  I think many girls daydream about Paris, the city of light.  So romantic, so fashionable, so beautiful.  Filled with wonderful monuments, gardens, boutiques, and pastry shops... what is not to love?  So I may have came to this city with a fantasized ideal, but Paris lived up to all of it.  

Here is what we ate while we were in Paris with some tips and what to expect for when you plan your Parisian adventure.  I will be attempting to recreate some of these meals and will post recipes so everyone can get a taste of France.  :)


DSC01597 DSC01598
Our first meal in Paris was at Bar du Central.  We weren't really hungry, so we just ordered some sandwiches and espresso.  I got the croque de madame and was excited to see vegetables (salad) on the plate after being hard-pressed to find any in Rome or Switzerland.  My husband had a club and french fries with mayonnaise for dipping.


DSC01702 DSC01704
Grabbing a sandwich and eating in one of Paris' famous parks is apparently what all the Parisians do.  So on our first full day, we ordered a chicken and brie baguette and a crepe with prosciutto, egg, and tomato and then strolled toward Luxembourg Gardens.  Interestingly enough, we ate our sandwiches under some buckeye trees (Ohio's state tree) which seemed to be everywhere in Europe.  Based on Paris, they must be easy to shape into, basically, tree hedges.  It was such a beautiful day, it seemed like all of Paris was lounging by the fountains taking it all in.
DSC01721 IMG_3415
Chances are if you have ever thought about visiting Paris, you have heard of Laduree.  Probably the most famous macaroons in the world.  They are mentioned in most Paris guidebooks and travel blog posts.  This was never on our itinerary... I don't even like macaroons.  But we were walking down a side street full of boutiques, but very few people, and stumble upon one of the Laduree houses.  With not a single person in line we popped in, ordered a few macaroons, and we were back on our way to the Louvre.  We ate our little french cookies while waiting in line at the museum (which moved quickly).  There were so many flavors but we picked rose petal, salted caramel, chocolate & coffee, and orange blossom.


DSC01832 IMG_3445DSC01833 DSC01834

Since our Airbnb apartment was close to the Eiffel Tower, based on our learnings from Rome, we walked in the opposite direction.  There was a neighborhood restaurant not far away that seemed pretty homey with lots of french classics on the menu.  We tried escargot for the first time.  It wasn't bad.  Kind of like oysters.  A little chewy with this kind of pesto sauce that it was cooked in.  Definitely worth trying at least once.

For my entree I had roasted chicken, a little salad, and some frites.  Real french fries seem a little more like steak fries and are usually in some sort of scoop shape, probably for scooping up mayonnaise, but they are good on their own.  And since we were doing french specialties, of course we had to have creme brulee for dessert.  Makes me kind of want my own little kitchen torch to brulee things at home.  Mmmm.


IMG_3398 IMG_3484
Every breakfast in France should include a croissant... so flaky and buttery!  I have always loved croissants, but french croissants... a total other level!  And the pastries... oh so good.  I'll definitely be trying to replicate this raspberry pastry when berries are back in season.  :)  It was like a thick shortbread cookie with a vanilla cream, raspberries, and powdered sugar.  Seems pretty simple, but so perfect.


DSC01904 DSC01907 DSC01906 DSC01908
The most expensive restaurant we went to in Paris was in a hotel, which it seemed like some of the best, highest rated restaurants in Europe were in hotels.  We only stumbled upon this place after being turned down from several recommended restaurants because we didn't have a reservation (most had ten or fewer tables, we should have known!).  Thoumieux had kind of a retro feel and our waitress was so nice.  She read the entire menu to us in english after seeing our confused looks as we tried to translate ourselves.

We started with a pizza souffle, which was kind of a thin pastry shell to a ball of air (hence souffle) with pizza toppings.  When our waitress brought it out we thought it looked like so much food and worried we wouldn't even begin to have room for our entree.  But then we cut into it and it deflated to a much more manageable sized first course.

For our entrees, I had filet mignon for the first time ever.  Not sure I appreciated as much as a steak lover would, but it was good.  The mashed potatoes had purple potato chips on top, kind of a mix of the softest and crispiest form of potatoes.  My husband had white fish on a bed of purple cauliflower and potatoes.  For dessert we had a cup of vanilla ice cream with caramel sauce and candied hazelnuts.


DSC02103 DSC02105
We were so tired after walking around Versailles all day, we really just wanted to collapse in our apartment and pack back up for London.  So we crossed the street and ate on the terrace of Cafe Central.  Most of the restaurants in Paris had more seating outside than inside, which made me wonder what they do in winter trying to seat just as many Parisians.  

On the train ride to Paris I was listening to an audio guide of tips for eating in Paris on Rick Steve's travel app.  In the audio, an expat mentioned one of her favorite meals was duck confit with potatoes cooked in the remaining duck fat.  Your really have to wonder how everyone in Paris is so slim if they are eating things like this regularly.  I noticed this exact meal was on the menu, so I figured it was my last chance and had to order it!  I had only had duck once before this time, this definitely changed my stance and I'll be trying to recreate this at home as well.  Oh... and we had another one of those raspberry pastries... so good!


 IMG_3545
To finish off our last night in Paris, we had to have some real french champagne!  We picked it up from a little shop on the corner and sipped champagne while packing and watching Family Guy in french.
More aboutEating Our Way Through Paris

Write Notes in Your Own Words

Posted by yanti


I can't really remember when I started doing this, but I'm pretty sure it was sometime around my Junior year of undergrad. Okay. Wait a minute. Actually, I can tell you exactly when I started doing this! I remember it like it was yesterday... it was indeed the fall semester of my Junior year. Apologize by OneRepublic was on the radio every 15 seconds and Facebook was still the only social media network we needed.


I was in a World Civilizations class (which somehow made me hate my favorite subject... history!). My professor was wonderfully nice, but she literally, LITERALLY typed entire pages/paragraphs of notes onto her PowerPoint slides. At first, I joined the whole class in frantically trying to copy each slide word for word, until I figured out that I could quickly read the paragraph, then paraphrase it into one or two sentences.

It was like reaching this super state of zen or something.


I was able to stay so calm during her lectures while everyone else stressed about the slides. And yes, that is the only time in my life that I have been less stressed than... oh, I don't know, anyone else. A lot of people went on to drop or fail that class (her tests were also 100 questions long). But not me. In fact, I did so well that it ended up being my first time to be exempt from an exam! Once I started grad school, I learned why paraphrasing the notes helped me so much.


And I totally love the reason because... it's science! It turns out that what I was doing (just to save my hand from getting a cramp) was called active listening. Instead of mindlessly copying words without thinking, I was forcing myself to comprehend the material before I could write it. That way, when I re-read my notes, I totally understood them because they were all in MY own words to begin with! 


On top of active listening, this gave me ownership over the notes... I created themThey were my wordsmy examples; not my professor's. And we all love the things that we create, right? That's why teachers aren't supposed to use red ink to grade papers anymore... It's just too traumatic for us to see our beautiful creations all covered in that mean-old red ink!


 Below, I have listed some articles on effective note taking, but the one I like the most is University of Reading because it compares Active Note-Taking and Passive Note-Taking! Passive Note-Taking includes things like underlining, highlighting, and copying from Power Point slides! All of our favorite things to do! When you look around your classroom, you are probably swimming in a sea of Passive Note-Takers!


BUT who wants to do more work and get less out of it? No one, that's who! So check out these examples of Active Note-Taking! Go into class with a purpose and with questions about the topic! Try to connect the new information you're learning to other information that you already know! Think of your own examples. And, of course, write notes in your own words! (unless you need to remember a direct quote, obviously).


Less writing, less study time, and better understanding of the topic?

Ummm... yes, please! :)


Here is a really cool article about Effective Note-Taking from University of Reading!


Do you take notes in your own words? Why or why not? 
If not, do you think you might start now?
More aboutWrite Notes in Your Own Words

Note Organization Checklist

Posted by yanti on Saturday, October 25, 2014


Keeping up with class notes can literally get a little messy sometimes. I didn't start rewriting mine until my junior year of college when my Landforms professor mentioned it... but ever since then, my newly-rewritten, color-coded notes have acted as study guides for upcoming quizzes, tests, and exams! So, knowing exactly where to find what information is super important! And obviously, it required a system! The way it looks has transformed over the years, but the main idea stays the same!


- KNOW ALL OF YOUR UPCOMING EXAM DATES -
Every semester, there are a certain number of quizzes and exams. They are almost always on the syllabus (I don't think I've ever had a college professor give a "pop quiz")... so there is pretty much NO reason not to be prepared for them! When I rewrite my notes, I try to make them look like a study guide... or an infograph... or something else remotely interesting to look at! Hence, all the different colors, silly doodles, and bullet points! Try to fit as much important info as you can onto one page!


- KEEP ALL OF YOUR NOTES IN THE SAME PLACE -
Then keep all of the notes from every class together and in chronological order! Last year, I tried out a filing system. This year, I'm using a binder. Some years, I just put them in a designated side of my class folder. Different things will work for different people (and different professors' teaching styles), so don't be afraid to change it up! Just be sure to be consistent with whatever system you choose to use! Keeping all the notes together is the most imperative part of keeping them organized!


- LABEL EVERY SINGLE PAGE WITH DATE & TOPIC-
Be sure that each page of notes is labeled with a date and topic header. This will help you quickly flip through the top of your papers as you look for particular chapter notes or notes from a specific time frame! Since tests are usually organized by a few chapters at a time (Chapters 1-4, or 5-8), it's helpful that these notes are all back-to-back wherever you choose to keep them. If you've been writing page numbers in your notes, you probably know exactly which pages the questions will come from, too! 


- INCLUDE GRAPHIC ORGANIZERS & OUTLINES -
And if you used a graphic organizer to help you rewrite your notes, definitely don't leave that out! Date and label them just like you would any other page of notes! In my opinion, these are some of the most helpful "study guides" because they are just very visually-easy to read. A good combination is to outline the actual textbook chapter and rewrite your class notes using a system that works for you! Between those two documents, you should have all info you need for the exam!


- MOVE "OLD" NOTES AFTER THE EXAM/QUIZ -
Once I finish with a particular section of notes, I either put them in the back of the "notes" section or I paperclip them together to let me know that I'm finished with that information. Don't throw them away! It's always nice to keep them around just in case you need to revisit something in the future... or if you have a (*DUN DUN DUN*) comprehensive exam at the end of the semester! (aka: how you know your professor really hates his/her life and wants you to be miserable, too).

If that's the case, better start those flashcards now!


-MAKE FREQUENTLY-VISITED INFO EASY TO FIND- 
Finally, don't be afraid to use some "mixed media" to help you quickly identify useful information in your notes! Post-It's, Sharpies, Washi tape are all awesome ways to draw attention to information that you'll need to find quickly again (...and again... and again) throughout the semester! At the end of the day, "organization" is a pretty subjective word, so you need to find out what it means to you and implement the best practices for yourself to keep up with the information in your notes!


And even though I joke about comprehensive exams, don't let them stress you out either! Because so much information is covered on them, nothing really gets too in-depth so I actually think they're easier than exams that cover more narrow scopes of information. 

If you don't take away anything else from this post, take away these two things: 
MAKE YOUR NOTES EASY TO READ & KEEP THEM TOGETHER!

Everything else is just the OCD-freakishness-icing-on-the-cake! :) 


How do you keep your notes organized throughout the semester! Do you tear them out of your notebook or just flag the pages? Or if you keep notes on your computer/iPad, how do you save/study them?!

More aboutNote Organization Checklist

How I Make Flashcards

Posted by yanti on Thursday, October 23, 2014


Because a photo is worth a thousand words (and a few paragraphs) today's post is written Sarah Vickers-style (and I say that out of love for her and her stylish ways). Well, with two exceptions: I took these photo myself and everything "featured" in them is less than $10 altogether. Okay, fine... three exceptions because I captioned the heck out of these photos to make up for the lack of writing! 

Okay, here are some flash cards I've made over the past year (and saved because they're obviously priceless). 

This is a cardboard gift box from Starbuck's, which turned out to be the perfect flash card holder!

My number one rule of flashcards is: MAKE THEM INTERESTING. The more colorful, the less I hate looking at them!

Aside from these markers, I really love the Crayola Tips ones (the skinny, white markers). PERFECT for notes!

I use whatever helps me remember the material: an acronym, a chart, an example, a picture... the sillier, the better!

For information that I'm already pretty familiar with, I just write some bullet points or a definition. 

Once I start studying, I highlight things I need to work on for next time... so apparently, I didn't do so well on this one!

Real-life examples are the best because they're just so memorable and obvious! 

For new or more challenging information, I get more in-depth by drawing charts, examples, graphs, pictures... this one is from some silly show on Bravo... but it worked perfectly for the definition! 

I worked in a restaurant over the summer and the menu was... though for me.
Whatever the opposite of a "foodie" is. That's me.

Graphic organizers even find their way into my flashcards! I used my Papermate Flair pens for these pictures, btw!


Do you make flashcards to help you study? I've heard it's helpful to cut the corners off... but I've never tried that, have you? Do you use pictures on your flash cards, too?!
More aboutHow I Make Flashcards